Table of Contents
In this article, we’ll how to Creating an SNS (Simple Notification Service) using the AWS Command Line Interface (CLI).
To create an Amazon SNS (Simple Notification Service) topic using the AWS Command Line Interface (CLI), you can follow these steps:
Step 1: Install and Configure the AWS CLI:
- If you haven’t already, install the AWS CLI on your machine by following the instructions in the AWS CLI User Guide.
- Configure the AWS CLI by running the “aws configure” command and providing your access key, secret access key, default region, and output format.
Installation Guide for AWS CLI for Linux , Windows and Mac Machine .
Step 2: Create an SNS Topic
- Open your command-line interface (e.g., Command Prompt, Terminal).
- Run the following command to create an SNS topic:
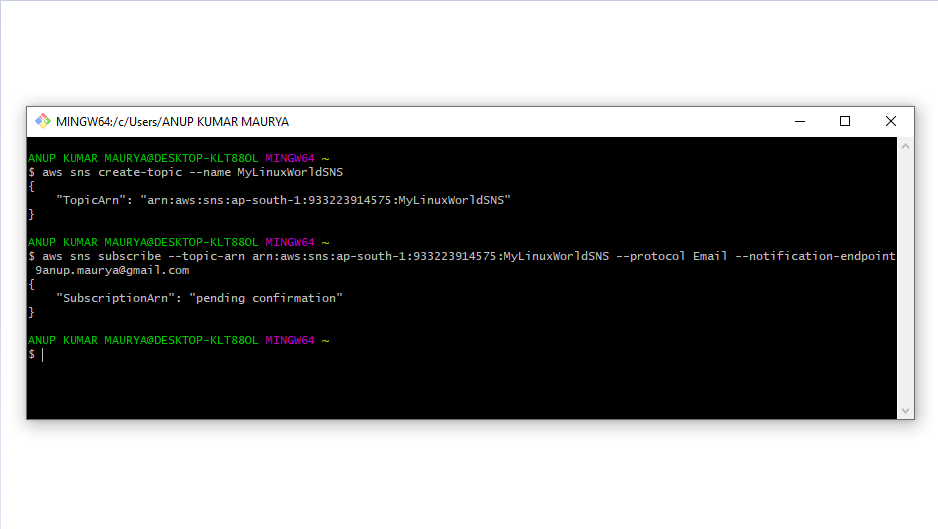
aws sns create-topic --name MyLinuxWorldSNSReplace “MyTopic” with the desired name for your SNS topic.
Step 3: Retrieve the ARN of the SNS Topic
- After running the previous command, the output will include the TopicArn, which is the Amazon Resource Name (ARN) of the created SNS topic.

Take note of the TopicArn value, as you’ll need it for subscribing and publishing to the topic.
Step 4: Create a Subscription
- Run the following command to create a subscription for the SNS topic:
aws sns subscribe --topic-arn your-topic-arn --protocol your-protocol --endpoint your-endpoint- Replace the placeholders with the appropriate values:
your-topic-arn: Replace with the Amazon Resource Name (ARN) of the SNS topic you created in the previous step. You can obtain the ARN from the response of thecreate-topiccommand or by using thelist-topicscommand.your-protocol: Replace with the protocol for the subscription. It can beemail,sms,http,https,lambda, or other supported protocols.your-endpoint: Replace with the endpoint based on the protocol. For example, if the protocol isemail, provide the email address. If the protocol ishttporhttps, provide the URL.
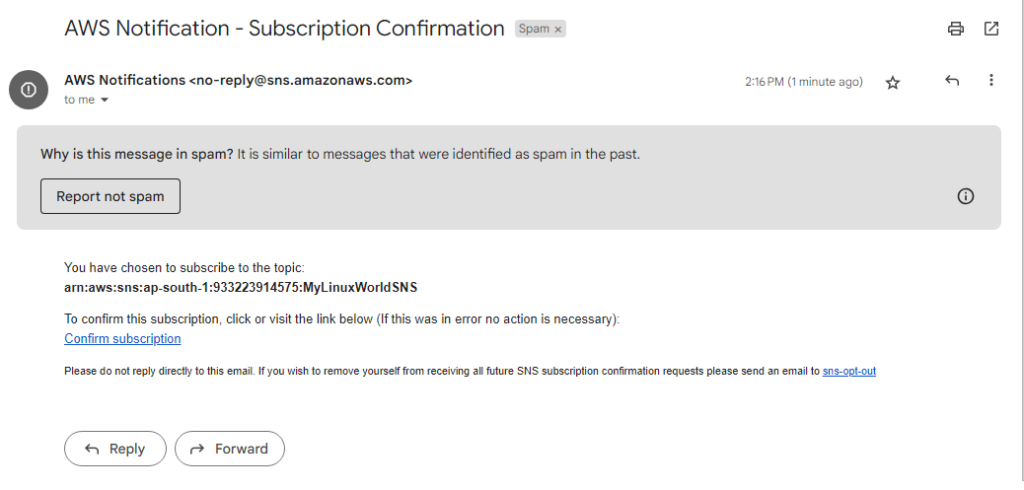
Subscription Confirmation Mail

Step 4: Publish a Message:
- Run the following command to publish a message to the SNS topic
aws sns publish --topic-arn your-topic-arn --message "Your message body"- Replace
your-topic-arnwith the ARN of the SNS topic, and"Your message body"with the desired message content.
That’s it! You have created an SNS topic, created a subscription, and published a message using the AWS CLI.
You can now subscribe endpoints (such as email addresses, Amazon SQS queues, etc.) to the topic and start publishing messages to it.
